
We built each Intonarumori box using very similar construction and parts, with minor changes to accommodate the unique properties of each box.
How to build a wooden box
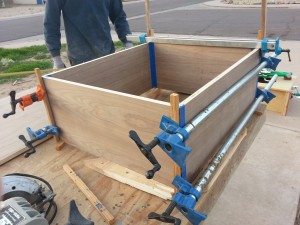
To build a good box, it is helpful to have a friend with carpentry experience and the right tools. In our case, this friend was Trevor Pan. Trevor showed us how to build a really good box and helped with a lot of the construction. If you don’t have someone like that available, try finding a local hackerspace like HeatSync Labs.
Here are some techniques we used:
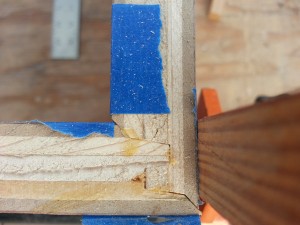
- We used a router to form the joints of the sides of the box (pictured above).
- Tops of boxes were attached using hinges, allowing each box to be opened easily.
- Each box had a latch and padlock so it could be closed securely.
- We attached handles to each box to ease carrying.
How to make a box make sounds

- A Raspberry Pi was the brains of each box, responsible for processing inputs and generating the sounds. We ordered ours from MCM Electronics. All of the software was custom made using Pure Data.
- Various electronic sensors (like buttons, throttles, etc.) were connected to an Arduino, which was in turn connected to the Raspberry Pi to provide the sensor input. (note: in many cases you can interface electronics directly with the Raspberry Pi – in our case we chose to use the Arduino because it made it easier for us to work with analog signals. Interfacing the Arduino with the Raspberry Pi via USB was extremely easy).
- A USB audio interface was also connected to the Raspberry Pi, providing audio output as well as audio input for some boxes. (note: if you only need audio output, you don’t need an additional audio interface as the Raspberry Pi has one built in)
- The sound interface output was connected to an amplifier, which was then connected to a speaker.
Why this design made the project a success
There were several things that really came together in the fabrication, allowing the project to be a success. One, the Raspberry Pi allowed us to develop and run sophisticated sound processing software on a tiny computer easily. This made it possible to achieve the quality of sound that we did, to do it in a relatively short time frame, and to package the final designs in completely self-contained portable boxes that just needed to be plugged in.
Two, the ease of interfacing the Raspberry Pi with the Arduino allowed us to leverage our prior knowledge of working with the Arduino, and made integrating electronics a manageable task.
Three, receiving advice and help from someone that actually knows how to build a wooden box was incredibly useful. Not only did we get compliments on the boxes themselves, but the boxes survived being sat on, stood on, spilled on, kicked, slammed, and bitten. OK they didn’t actually get bitten, but if they had been, they would have survived.
Box Fabrication Pictures


For more pictures and videos, see our Facebook page.